Tuesday, June 25, 2013
Pretty Little Girl's Spring Dress
Needed a quick and easy spring dress for my daughter to wear to my nephew's baptism. Plus, wanted something she could wear next year too, so I made it roomy. Love the fabric! She looked so cute. Unfortunately I didn't take a good pic of her at the baptism only this crazy one of me trying it on her when her hair was all wild.
Sunday, June 16, 2013
Father's Day Gift Ideas
What to get the man that has everything? Pajama pants? Yup, that's right. And not just any pajama pants. I decided to make manly gift baskets for my dad and for my husband.
First the husband. He loves Superman so I decided to take him to see Man of Steel for Father's Day. I purchased a huge plastic Popcorn tub from Bed Bath & Beyond, put the tickets to the movies in there, popcorn, candy, a huge can of Coke, a movie t-shirt I ordered from Allposters and my handmade pajama pants!
Want to know how I made the shirt without silkscreening? Magic! Well, almost. It's called Ink Effects made by Deco Art. All you do is pain the ink effects on a piece of paper, let it dry and then iron it onto a shirt. Since I had a dark shirt, I had to use their base coat spray first, but it was pretty easy, even though my pain brush was way too big for the tiny areas I was painting.
First the husband. He loves Superman so I decided to take him to see Man of Steel for Father's Day. I purchased a huge plastic Popcorn tub from Bed Bath & Beyond, put the tickets to the movies in there, popcorn, candy, a huge can of Coke, a movie t-shirt I ordered from Allposters and my handmade pajama pants!
My father loves the Beatles, so I decided to put together a basket of some of his favorite things which include Beatles pajama pants, a shirt I made myself, his favorite snacks, men's beauty products and a free haircut at his barbershop.
Saturday, June 15, 2013
The Best End of Year Teacher Gift
 Yes, you read that right. This is the best end of year teacher gift ever! And I'm not only saying that because I made it.
In fact, the idea wasn't my own. Surprise, surprise, I found this fantastic idea on Pinterest. It's basically a really creative way of gifting a teacher a potted plant, only it's handmade.
I liked this idea so much that I decided to make a large pot for my daughter's teacher and some smaller versions for the two teacher's assistants.
We gave them to the teachers on Friday and they loved them! Who wouldn't, right?
SUPPLIES
SUPPLIES
- Metal pails (found mine at A.C. Moore)
- Mod Podge
- Plant labels
- Succulents (found mine at a local nursery)
- Succulent or cactus soil
- Gravel
- Twine
- An old dictionary (found one at Goodwill for only $2.67!)
- Black card stock
- Glue stick
- Xacto knife
INSTRUCTIONS
First, drill a few holes in the metal pails for drainage.
First, drill a few holes in the metal pails for drainage.
Then, cut out some pages from the dictionary and glue them to the pail using mod podge. I chose pages that had the words "teacher", "educator", "learning", "fun", etc. I found that it's easiest to cut the pages to the shape of the pail after you've started to adhere them. I used a sharp Xacto knife to do this. Then coat the outside of the pot with another layer of mod podge.
I have to admit, I was scared to re-pot these plants. They seem very fragile and I didn't want to break them. So I made my husband do it. Start off by putting a little gravel in the bottom of each pot and fill it with soil, leaving enough room for your plants. Carefully add each plant and cover it with more soil. He filled it to the top knowing that once we watered the newly potted plants, the soil would get packed down.
Here's what it should look like:
I printed out some small sayings 2"x3" that said "Thanks for helping me grow this year!" and used a glue stick to adhere them to some scraps of dictionary pages 2.5"x3.5". Then I glued them onto some black card stock 3"x4". Punched a .25" hole in the top and added some twine.
I took some white plastic plant labels, wrote "grow" on them with a sharpie and added them to each pot.
I tied my labels on and then watered them. I put them onto a deep dish pizza pan to make sure that water didn't go everywhere until I was ready to take them to the teachers.
Everyone should try this! It's super easy!
Labels:
decoupage,
mod podge,
plants,
succulents,
teacher gift
Saturday, June 8, 2013
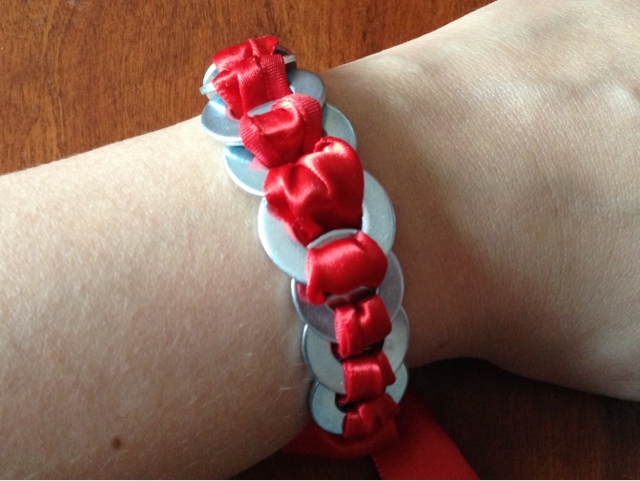
DIY Washer Bracelet
I've been dying to try this project I found on Pinterest.
I used some left over ribbon, ten size 10 washers, three size 8 washers and about ten minutes.
So cute, right?
Next I want to try adding designs to the washers and use Mod Podge Dimensional Magic to make them look more fancy like this.
Subscribe to:
Posts (Atom)


